Hướng dẫn cài đặt & sử dụng Uprika
Cấu hình nhà cung cấp AI, kết nối thông tin đăng nhập store và bắt đầu tối ưu hóa listing trên App Store và Google Play.
1. AI Provider Setup
Uprika uses AI to generate listings, brainstorm keywords, translate content, and create screenshot templates. You bring your own AI provider — Uprika supports any OpenAI-compatible API.
Your API keys stay local. Keys are stored in your OS secure keychain (macOS Keychain, Windows Credential Manager, Linux Secret Service) and are never sent to any Uprika server.
Ollama — Free, Local AI
Ollama runs AI models entirely on your machine. No API key, no cloud, no cost. Best for users who want full privacy or don't want to pay for API calls.
Step 1: Install Ollama
- Go to ollama.com and download the installer for your OS.
- Install and launch Ollama. It runs as a background service.
Step 2: Pull a Model
Open your terminal and pull a recommended model:
# Recommended for ASO (good quality, fast)
ollama pull gemma3:12b

# Lightweight alternative (faster, less quality)
ollama pull gemma3:4b

# Premium quality (needs 16GB+ RAM)
ollama pull qwen3:14b
Step 3: Configure in Uprika
- Open Uprika → Settings
- Under AI Provider, select Ollama
- API Base URL:
http://localhost:11434/v1(default, no change needed) - Model Name: enter the model you pulled (e.g.
gemma3:12b) - API Key: leave empty (Ollama doesn't need one)
- Click Test AI to verify the connection
Performance note: Local models are slower than cloud APIs. A 12B model on an M1 Mac generates a full listing in ~30-60 seconds. Larger models produce better quality but need more RAM.
Replicate — Cloud AI Without API Key Concerns
Replicate gives you access to thousands of open-source models (Llama, Mistral, etc.) with a simple pay-per-use pricing — no monthly commitments, you only pay for what you use.
Step 1: Create Account
- Go to replicate.com and sign up.
- New accounts get free credits to start.
Step 2: Get Your API Token
- Go to Account → API Tokens
- Click Create Token
- Copy the token (starts with
r8_)
Step 3: Configure in Uprika
- Open Uprika → Settings
- Under AI Provider, select Custom / OpenAI-compatible
- API Base URL:
https://openai.replicate.com/v1 - API Key: paste your Replicate token
- Model Name:
meta/llama-4-scout-instruct(or any model from their catalog) - Click Test AI to verify
Tip: Replicate offers spending limits you can set in your account dashboard. Great for keeping costs predictable.
Other Providers
Uprika works with any OpenAI-compatible API. Here are quick links for popular providers:
| Provider | API Base URL | Docs |
|---|---|---|
| OpenAI | https://api.openai.com/v1 | Docs |
| Google Gemini | https://generativelanguage.googleapis.com/v1beta/openai | Docs |
| Anthropic Claude | https://api.anthropic.com/v1 | Docs |
| OpenRouter | https://openrouter.ai/api/v1 | Docs |
| Groq | https://api.groq.com/openai/v1 | Docs |
| Ollama (local) | http://localhost:11434/v1 | Docs |
For all providers: go to Settings → AI Provider, enter the API Base URL, API Key, and Model Name, then click Test AI.
2. Store Credentials
To publish listings directly to the App Store or Google Play from Uprika, you need to set up API credentials. Credentials are stored in your OS secure keychain — never sent to any server.
Google Play Store
Step 1: Create a Google Cloud Project
- Go to Google Cloud Console
- Create a new project (e.g.
uprika-play-api)
Step 2: Enable the Google Play Android Developer API
- In your project, go to APIs & Services → Library
- Search for Google Play Android Developer API
- Click Enable
Step 3: Create a Service Account & Download JSON Key
- Go to APIs & Services → Credentials
- Click + Create Credentials → Service Account
- Name it (e.g.
uprika-play-access), click Create - On the Credentials page, click the service account email to open details
- Go to Keys tab → Add Key → Create new key → JSON
- The JSON key file downloads automatically — keep it safe
Step 4: Grant Permissions in Google Play Console
- Go to Google Play Console
- Navigate to Users and permissions
- Click Invite new users
- Paste the service account email (from the JSON key's
client_emailfield) - Grant these permissions:
- View app information and download bulk reports
- Create, edit, and delete draft apps
- Manage store presence
- Click Invite user
Note: Permissions may take up to 24 hours to propagate after inviting.
Step 5: Import into Uprika
- Open Uprika → Settings → Store Credentials
- Under Google Play Store, click Upload JSON Key
- Select the JSON file you downloaded
Apple App Store
Step 1: Generate an API Key
- Go to App Store Connect
- Navigate to Users and Access → Integrations → App Store Connect API
- Click + to generate a new key
- Name:
Uprika ASO Access - Role: App Manager (recommended — minimum permission needed)
- Click Generate
Step 2: Download the .p8 Key File
- Click Download API Key next to the new key
- Save the
.p8file securely
Important: You can only download the .p8 file once. If you lose it, you must revoke the key and create a new one.
Step 3: Note Your Key ID & Issuer ID
- Key ID — shown next to your key name (e.g.
ABC1234DEF) - Issuer ID — shown at the top of the API page (a UUID)
Step 4: Import into Uprika
- Open Uprika → Settings → Store Credentials
- Under Apple App Store, enter:
- Issuer ID
- Key ID
- API Key File — upload your .p8 file
App Store publishing note: Description, keywords, and screenshots can only be updated when you have a version in "Prepare for Submission". If you see an error, create a new version in App Store Connect first.
3. Getting Started
When you open Uprika for the first time, an onboarding screen will guide you to set up your AI provider (Ollama for local AI, or configure a cloud provider in Settings). Once that's done, here's the typical workflow:
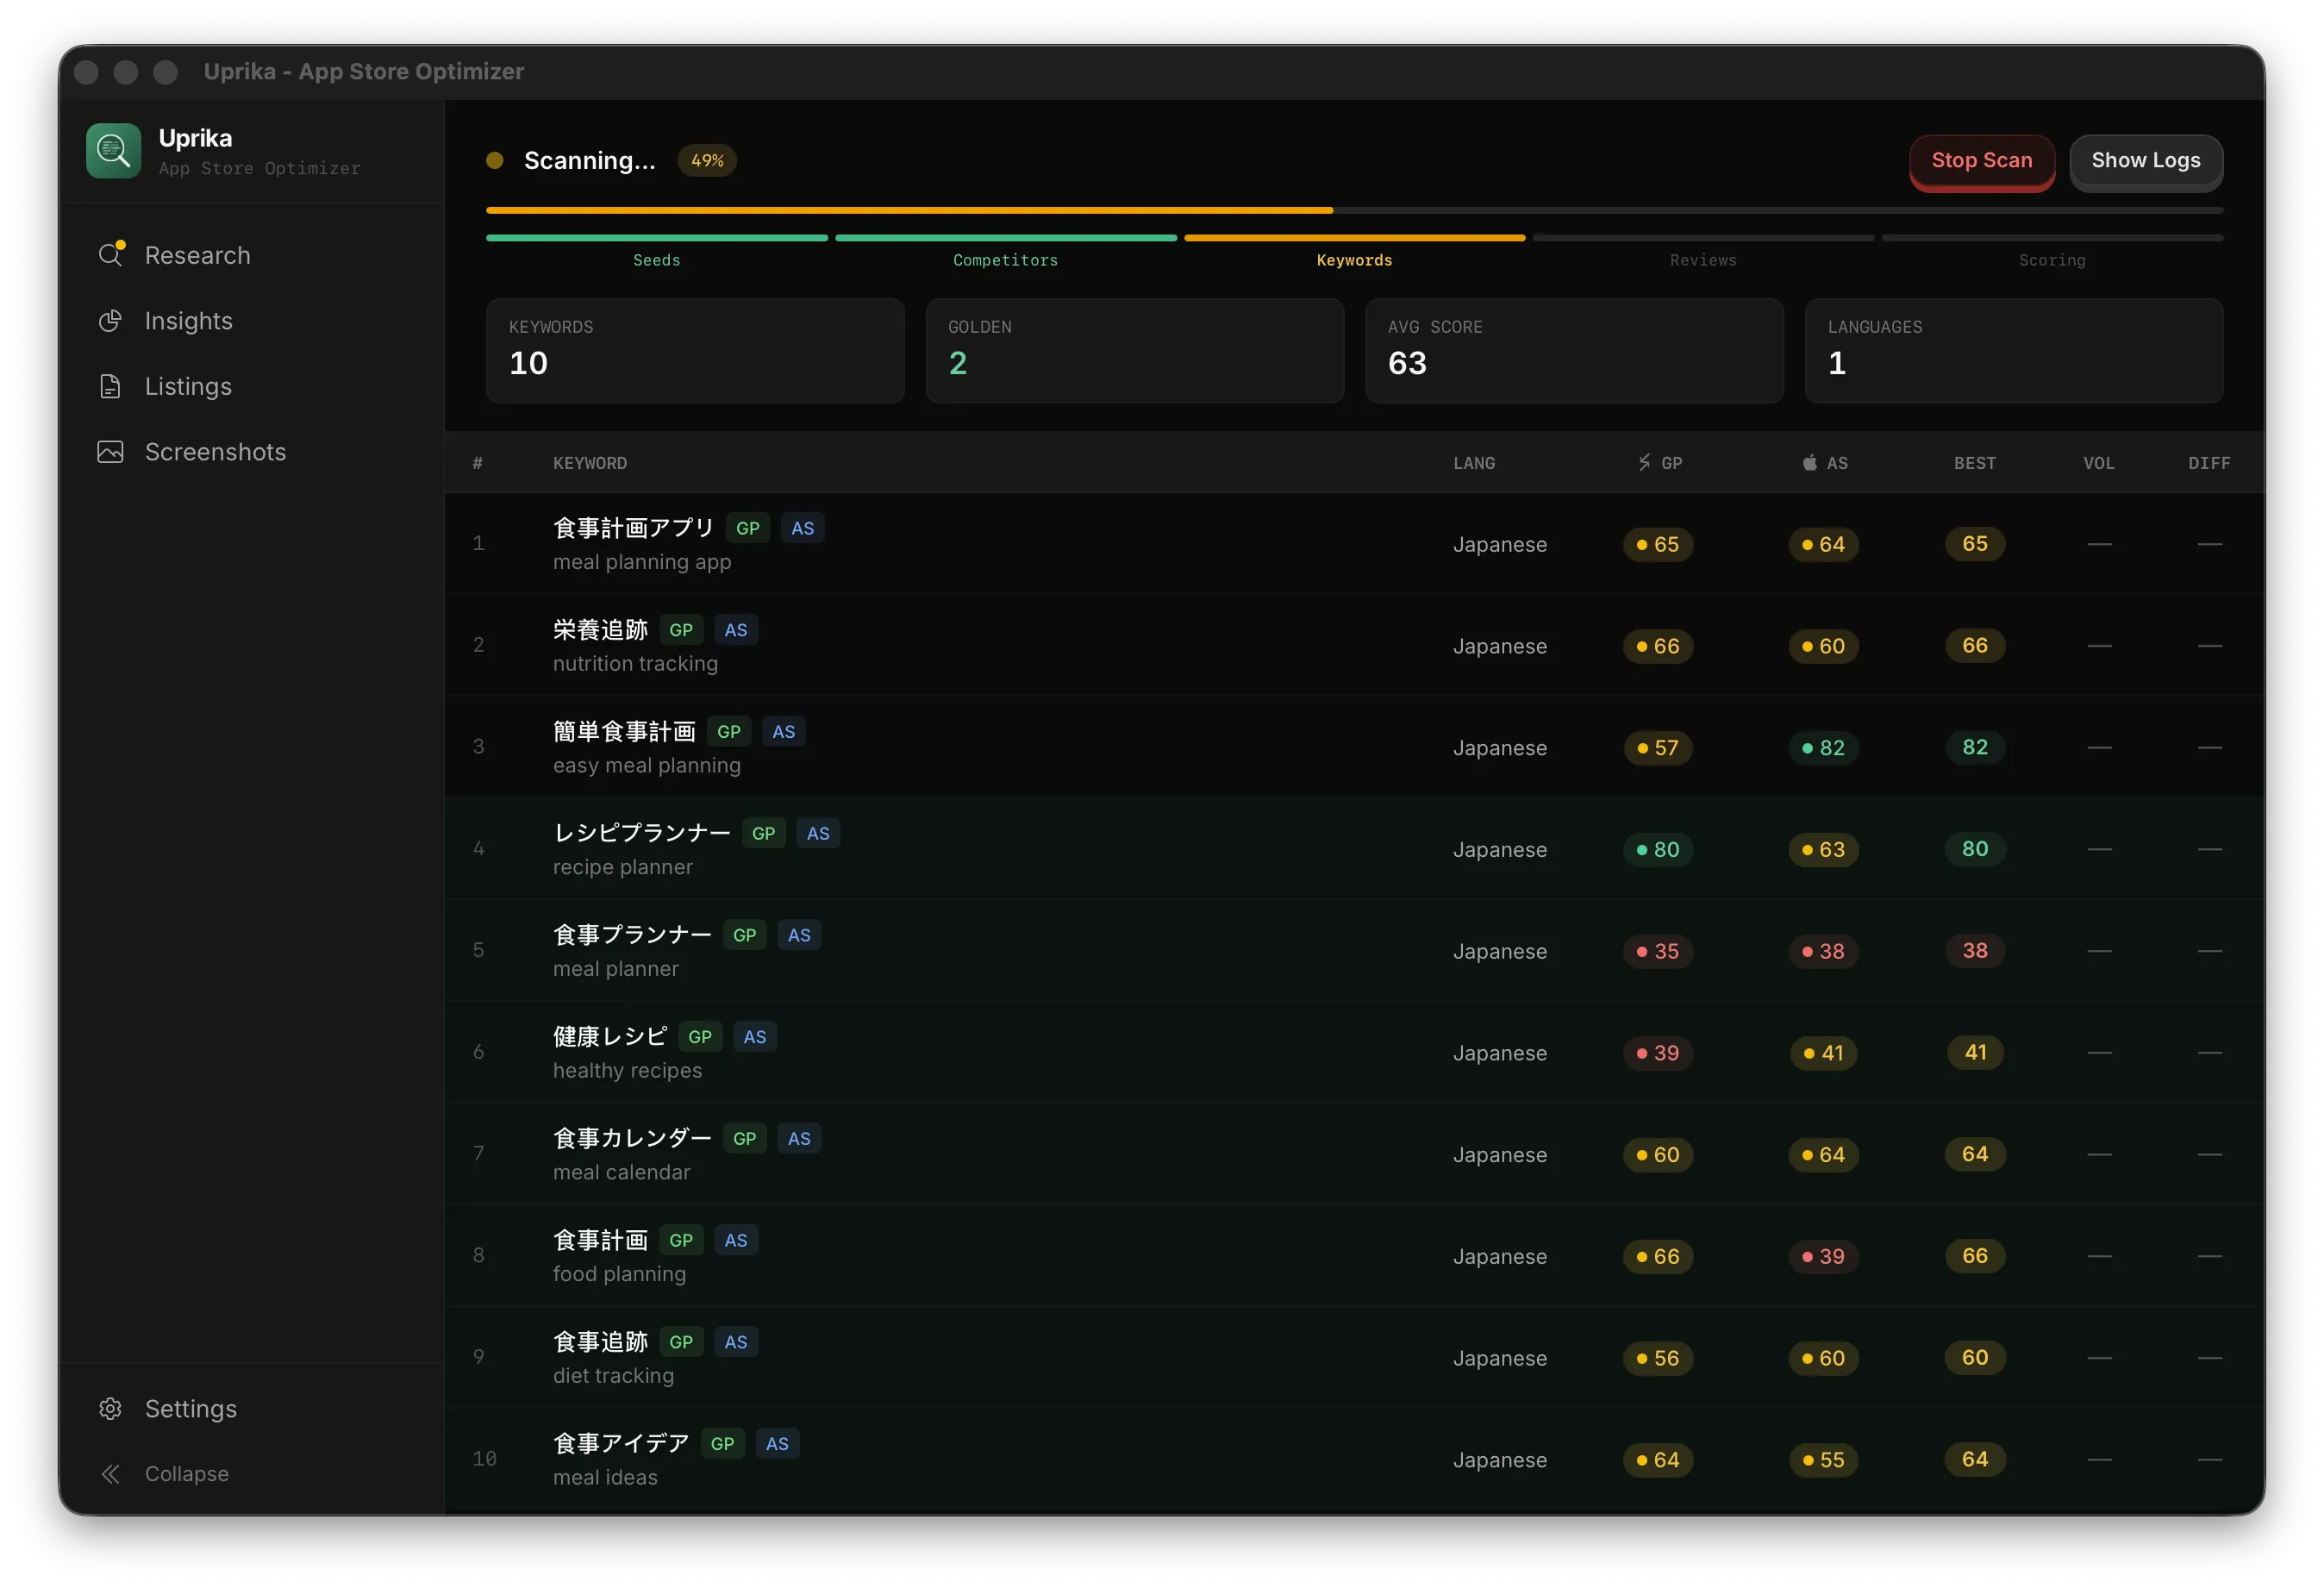
Run a Keyword Scan
From the Research page, enter your app idea and select target languages. Uprika scrapes both the App Store and Google Play to find keyword opportunities, then scores them using AI.
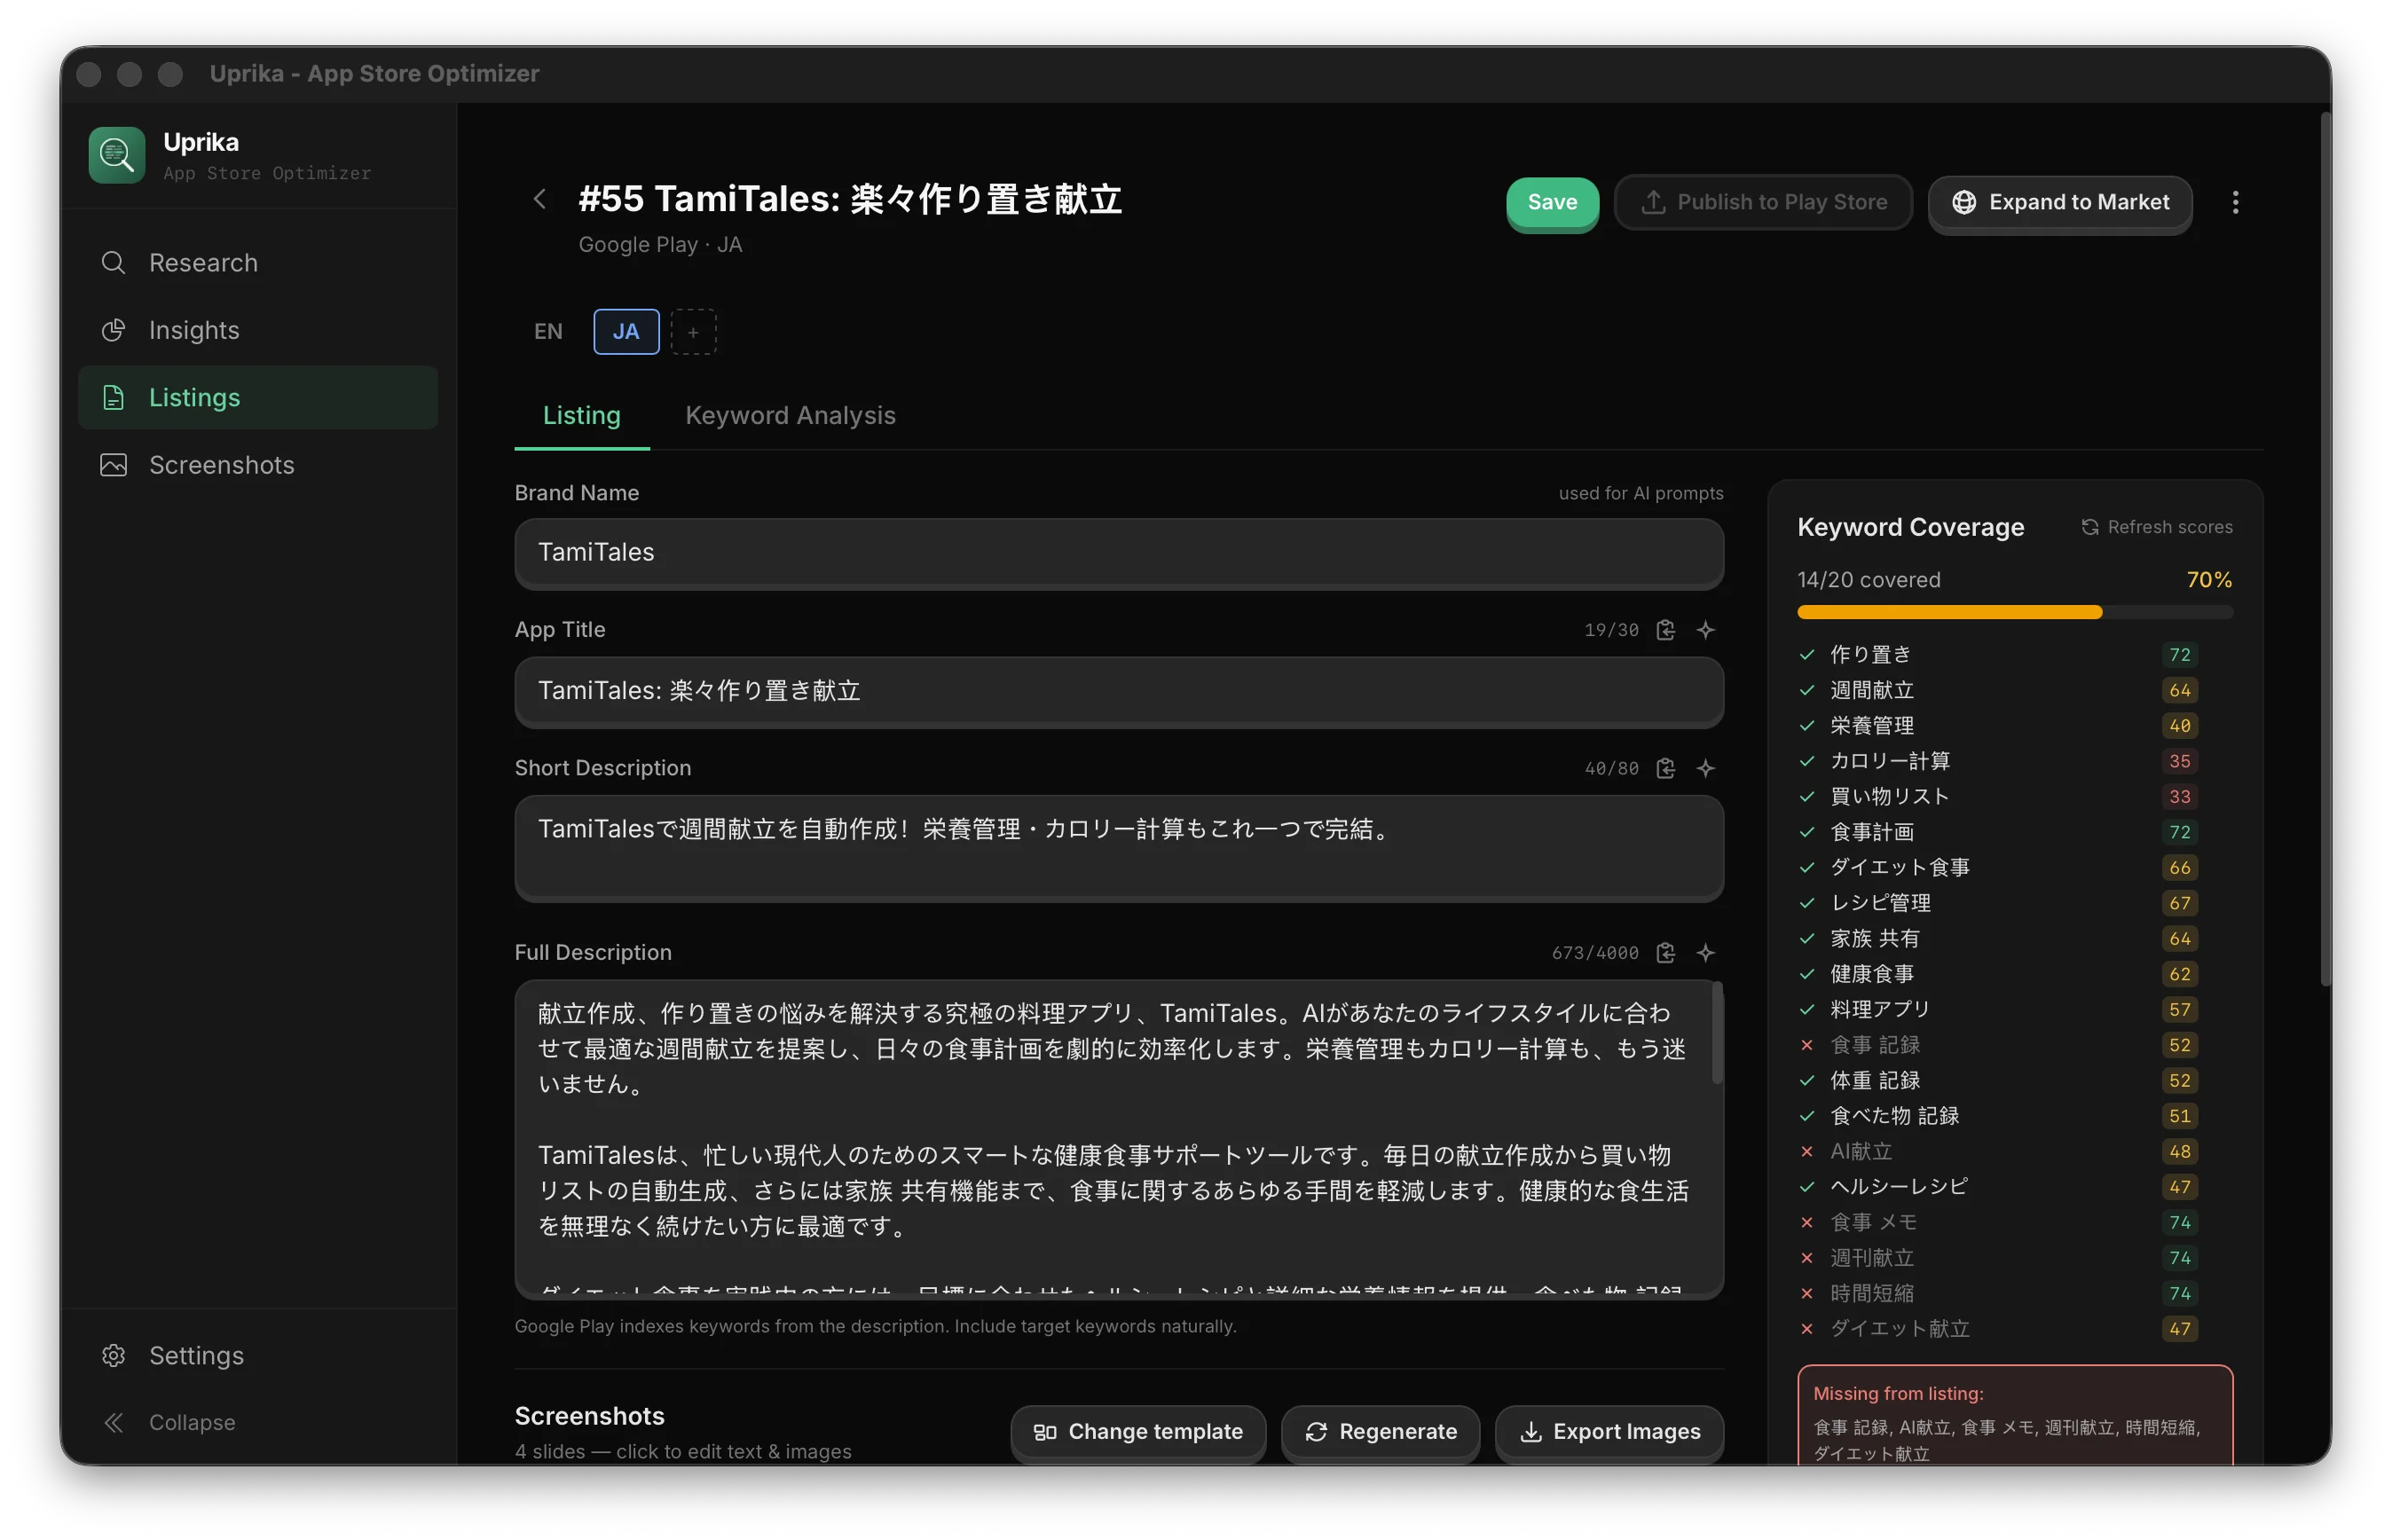
Create a Listing
From the scan results, create an AI-generated listing. Uprika generates title, subtitle, description, keywords, and promotional text — all optimized for the keywords found in your scan.
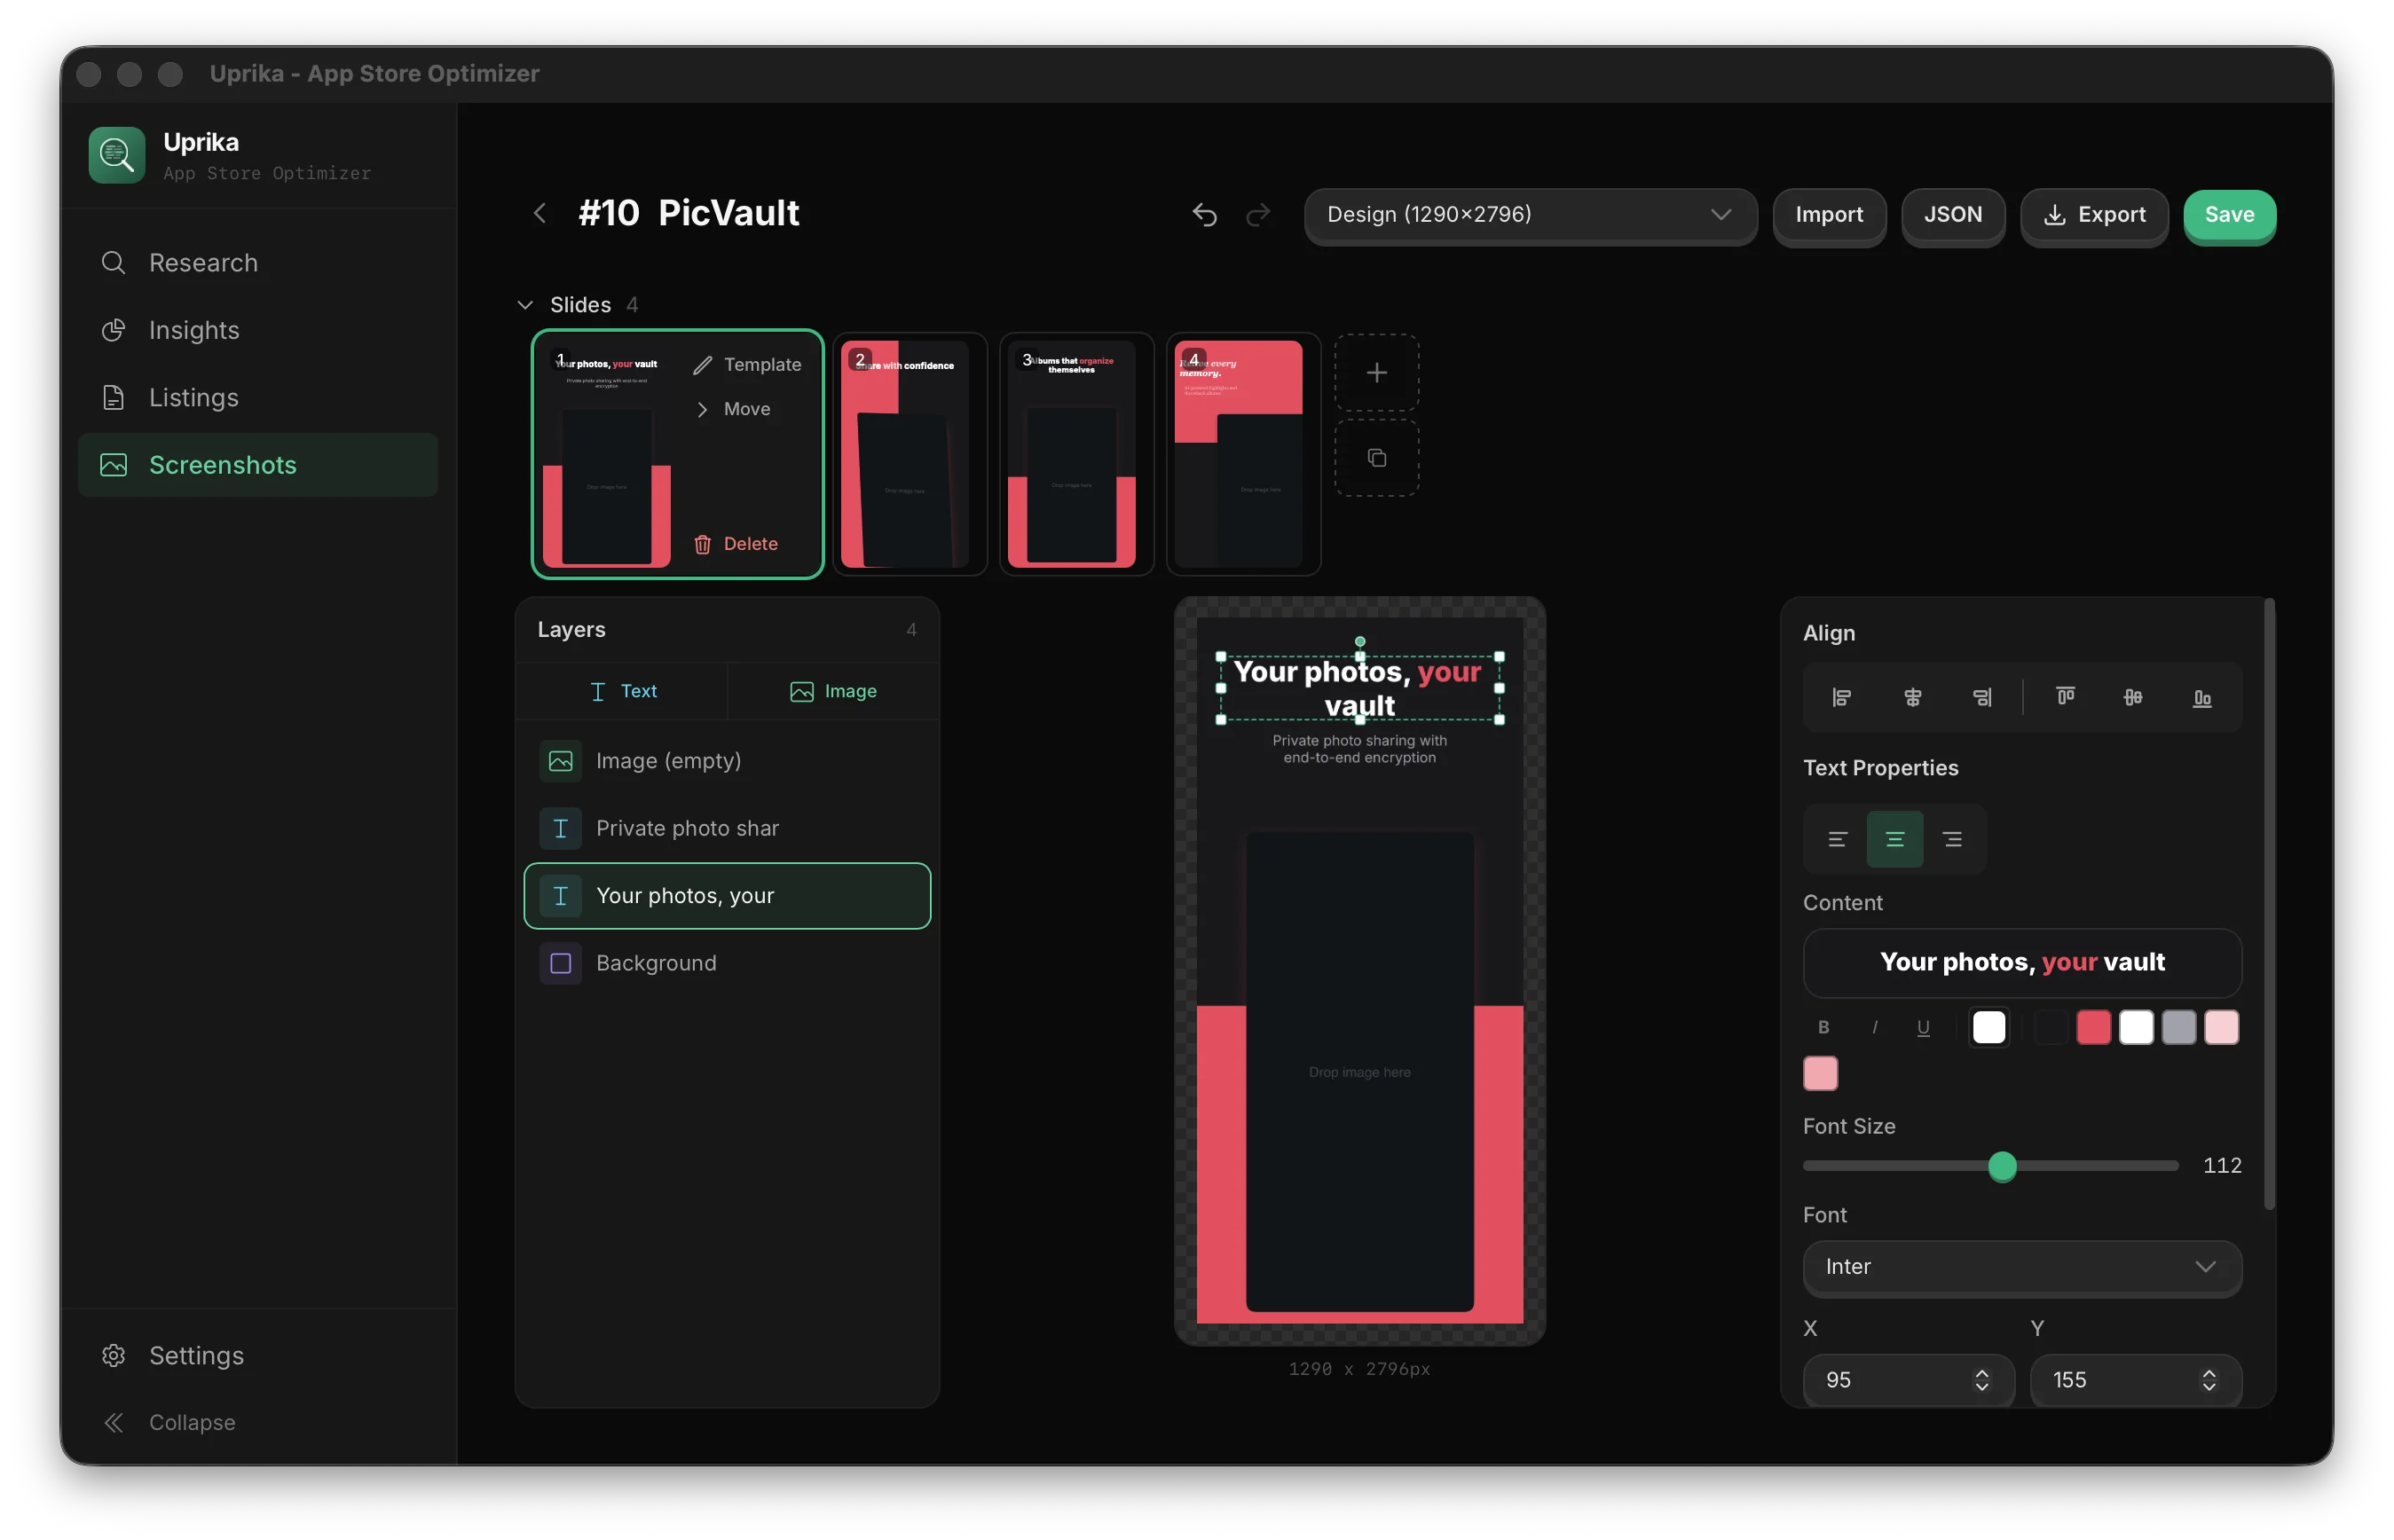
Build Screenshots
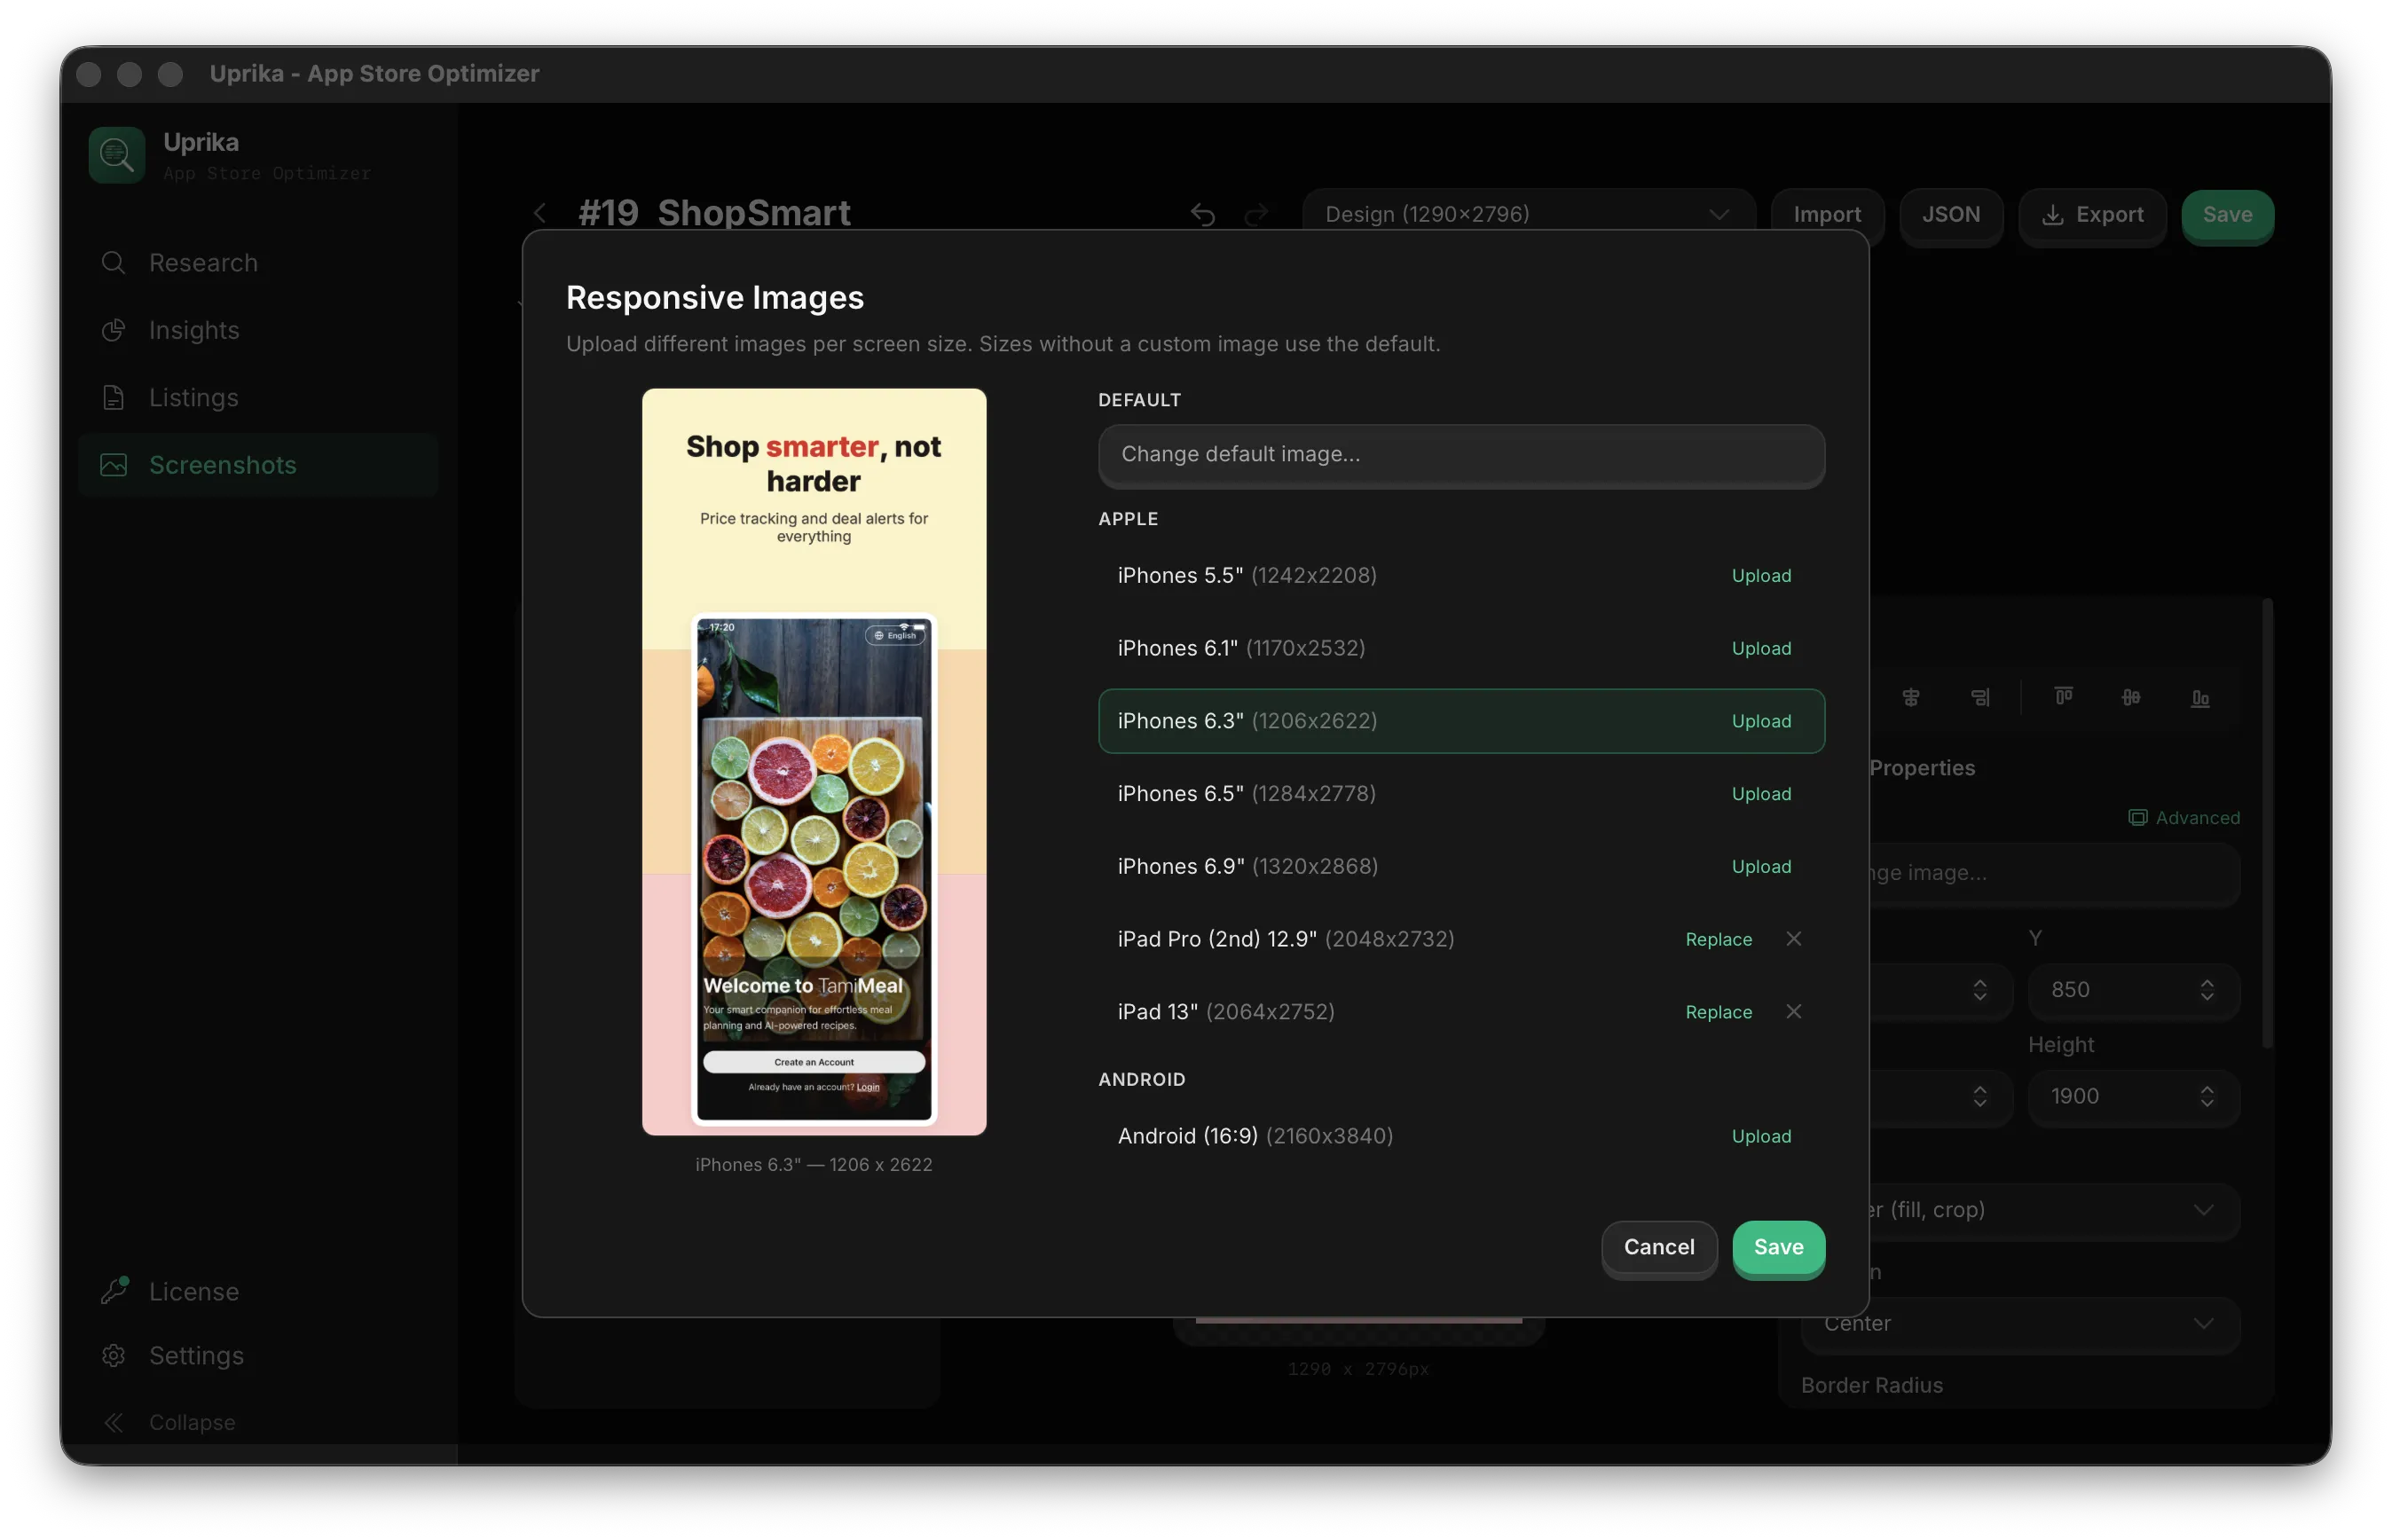
Use the Screenshot Builder to create app store screenshots from 86+ ready-made templates. Customize text, images, colors, and export at all required device sizes.
Each image element supports Responsive Images — upload different images per device size (iPhone 5.5", 6.1", 6.5", iPad, Android). Sizes without a custom image automatically use the default. This ensures your screenshots look perfect on every device listed in the App Store and Google Play.
Expand to Markets
From any listing, expand to new languages with one click. AI translates and optimizes the listing for each market. Screenshot text is translated automatically.
Publish
Click Publish to push your listing text and screenshots directly to the App Store or Google Play. Select which languages to include — all published in one go.
Tip: You can create additional projects to organize keyword research for different apps. Go to the Research page and use the project selector at the top.
4. Keyword Gap Analysis
The Keyword Gap tool helps you find keywords that your competitors rank for but you don't. It's available in the Keywords tab of any listing.
How it works
- Open a listing and switch to the Keyword Analysis tab
- Uprika compares your listing's target keywords against competitor apps from your scan data
- Each keyword shows a source badge (GAP = competitors have it, you don't; YOU = you already target it) and which competitors use it
- Click any keyword to search it on the store and see the real search results
- Select missing keywords and click Add to Target to include them in your listing
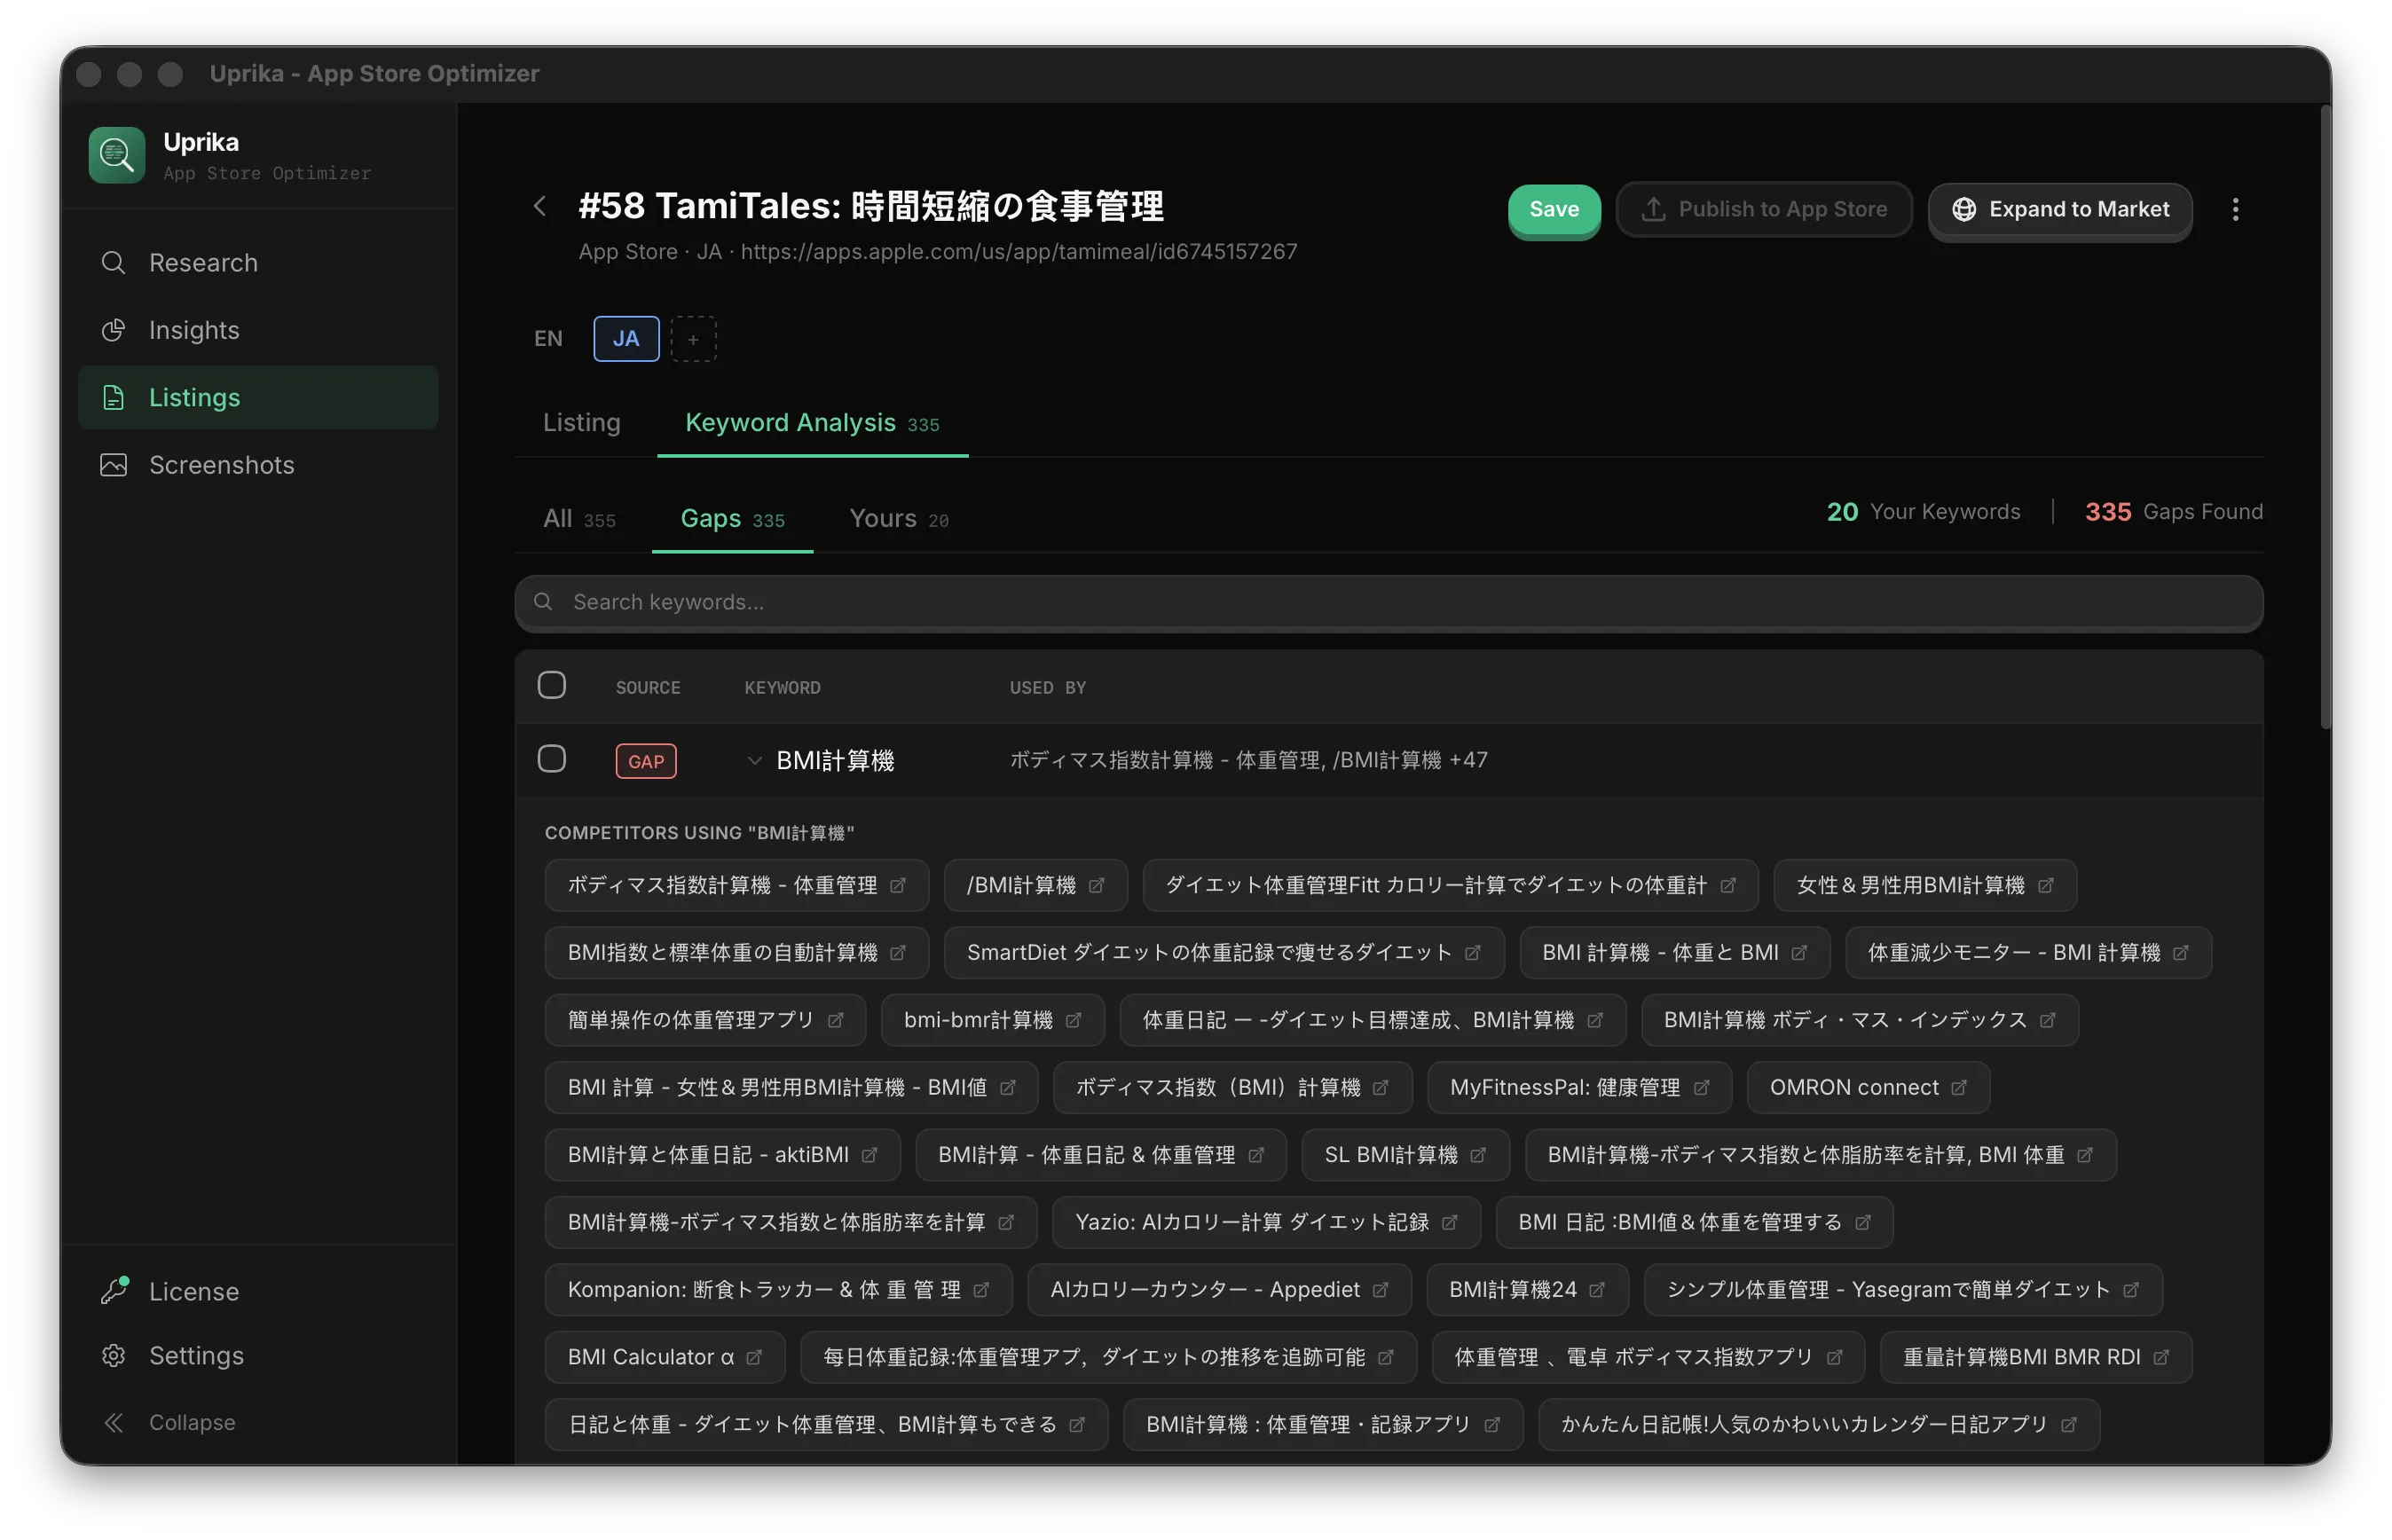
Tip: After adding gap keywords, click Regenerate All to have AI rewrite your listing with the new keywords incorporated naturally.
5. Competitor Analysis
The Competitors page aggregates all competitor apps discovered across your scans. Use it to analyze the competitive landscape — see ratings, download counts, developers, and categories at a glance.
What you can do
- Browse all competitor apps discovered during keyword scans
- Filter by Market Gap — popular apps (GP: 100k+ downloads, AS: 5k+ reviews) with below-average ratings (<4.0). These are apps where users are unhappy — your opportunity to build something better
- Filter by Top Rated — top 50 most-reviewed apps with high ratings. Study their core features and monetization strategy
- Search by name, developer, or category
- Filter by store (App Store / Google Play) and language
- Fetch Details — batch-downloads full descriptions from app stores for all competitors. Runs in background with progress tracking. Cached for 7 days (configurable in Settings)
- Click any competitor to expand and view their full description
- Export competitor data as CSV or JSON for further analysis

Tip: Use the Market Gap filter to find popular apps with poor ratings. Read their descriptions and reviews to understand what users want — then build your app to solve those pain points.
6. CLI / Automation
Uprika includes a CLI for automating ASO workflows. The CLI is the same binary as the app — when you pass a command, it runs in terminal mode.
Setup
- macOS: Open Uprika → Settings → CLI / Agent Access → click Install. This creates a symlink so
uprikaworks from any terminal. - Windows: The installer adds Uprika to your PATH automatically.
- Linux (deb): Already in PATH at
/usr/bin/uprika.
Example Commands
# Run a keyword scan
uprika scan --idea "fitness tracker" --langs "en,ja,de"

# Create a listing with AI
uprika create-listing --app-idea "meal planning app" --store "app_store"

# Publish all languages to the store
uprika publish --listing-id 123

# Export screenshots
uprika get-listing --id 1 --export-screenshots ./output/
For TOTP authentication setup and full command reference, see Settings → CLI / Agent Access in the app.